The “named.conf” file
When it comes to DNS and BIND, one of the most important files to work with is the one called “named.conf”, that is located at the following path:
/etc/named.confDefault settings
Out of the box, I mean immediately after a fresh installation of BIND you’ll see the following content inside the fil “named.conf”, see below.
//
// named.conf
//
// Provided by Red Hat bind package to configure the ISC BIND named(8) DNS
// server as a caching only nameserver (as a localhost DNS resolver only).
//
// See /usr/share/doc/bind*/sample/ for example named configuration files.
//
// See the BIND Administrator's Reference Manual (ARM) for details about the
// configuration located in /usr/share/doc/bind-{version}/Bv9ARM.html

options {
	listen-on port 53 { 127.0.0.1;};
	listen-on-v6 port 53 { ::1; };
	directory 	"/var/named";
	dump-file 	"/var/named/data/cache_dump.db";
	statistics-file "/var/named/data/named_stats.txt";
	memstatistics-file "/var/named/data/named_mem_stats.txt";
	recursing-file  "/var/named/data/named.recursing";
	secroots-file   "/var/named/data/named.secroots";
	allow-query     { localhost;};

	/*
	 - If you are building an AUTHORITATIVE DNS server, do NOT enable recursion.
	 - If you are building a RECURSIVE (caching) DNS server, you need to enable
	   recursion.
	 - If your recursive DNS server has a public IP address, you MUST enable access
	   control to limit queries to your legitimate users. Failing to do so will
	   cause your server to become part of large scale DNS amplification
	   attacks. Implementing BCP38 within your network would greatly
	   reduce such attack surface
	*/
	recursion yes;

	dnssec-enable yes;
	dnssec-validation yes;

	/* Path to ISC DLV key */
	bindkeys-file "/etc/named.root.key";

	managed-keys-directory "/var/named/dynamic";

	pid-file "/run/named/named.pid";
	session-keyfile "/run/named/session.key";
};

logging {
        channel default_debug {
                file "data/named.run";
                severity dynamic;
        };
};

zone "." IN {
	type hint;
	file "named.ca";
};

include "/etc/named.rfc1912.zones";
include "/etc/named.root.key";
Changes to be made on “named.conf”
For our LAB is going to be enough to just modify a few lines, in line number 13th we’re going to add the IP Address of our CentOS 7 machine, that represents the actual server itself.

On line number 21rst we’re going to add the network where our server will provide DNS services, in our LAB that is going to be 192.168.0.0/24

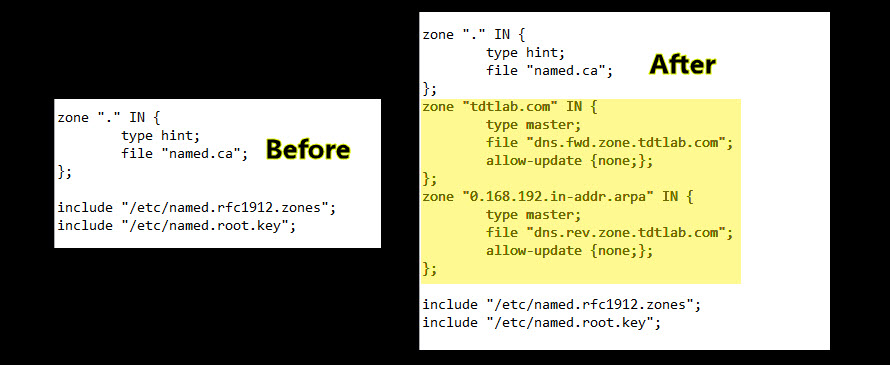
On line number 58th we’re going to add both the Forward and the Reverse zones settings, feel free to copy the text from below and adapt it to your own LAB.
zone "tdtlab.com" IN {
        type master;
        file "dns.fwd.zone.tdtlab.com";
        allow-update {none;};
};
zone "0.168.192.in-addr.arpa" IN {
        type master;
        file "dns.rev.zone.tdtlab.com";
        allow-update {none;};
};
Basically we’re defining the “Domain Name” (tdtlab.com) of our LAB and also both the Forward and the Reverse files, where we’ll have to add later each and every new device to be served by the DNS.
Syntax errors validation
It is always a good idea and also a best practice to validate the syntax of the “named.conf” file before trying to start the service, for that purpose you can use the following CLI command.
named-checkconf /etc/named.conf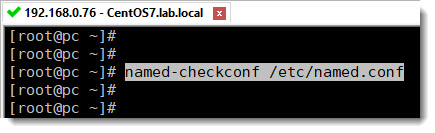
Be aware this tool only checks the syntax, but not the semantics of a named configuration files i.e. it can check for syntax errors or typographical errors but it cannot check for wrong MX/A address assigned by you. Nevertheless, this is an excellent tool for troubleshooting DNS server related issues.